Daz Cow Share and Learn Thread
Daz 3D Forums > General > New Users>Daz Cow Share and Learn Thread
Daz 3D is part of 
Connect
DAZ Productions, Inc.
7533 S Center View Ct #4664
West Jordan, UT 84084
Licensing Agreement | Terms of Service | Privacy Policy | EULA
© 2025 Daz Productions Inc. All Rights Reserved.
Comments
Ok, sooo.. here is what i have been able to do with the Daz cow in hexagon. The redish cow is the original daz cow in zero position. The brownish is my upgraded version of the Daz cow in zero position. I put the tail down so they would fit in the scene. lol
Conclusion is the Daz Cow can not be updated in any way shape or form, mostly because she is a poser cow. We are not able to save even morphs I made from her because she has to be a triax figure, which she is not. We can not really make her a triax figure, etc because it would violate Daz copyright. Anyways, to make a long story short. If a person does want to fix up their cow you can, but you can only use it for personal use. Bummer.... I was hoping. Well, I am going to fix her up more for myself. It is good to learn how to make characters, morphs, new uvmaps, etc. I will show my work here on the thread and help others out who might want to upgrade their daz cow for their own uses.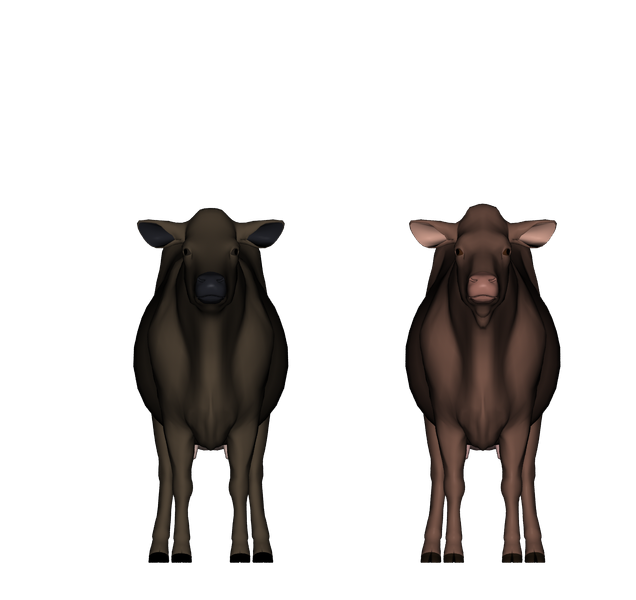
Sort of along these lines (heh) I was chopping away at some primitives in Hexagon and I almost made a "phage" (eg. a virus) but I got an n-gon and you know what happened next!
Looking at the DAZ (Ajax and Noggin) fly ("fly" as in a 3-D model of an insect) though I was struck by the extent to which this model -- or something similar -- might benefit from "new technology" and more recent knowledge: real faceted eyes (aren't they supposed to be hexagons, as opposed to doing it with a texture... or maybe it could be a new, Iray-compatible shader?), more translucent wings, and some LAMH on the legs and abdomen!
Perhaps you could link your most-recent message to a FAQ file about what can/cannot be done under the current PA/EUL agreements... in my post in the Hex forum I do mention the above insect model and how bacteria and other microbes and similar stuff just SUPER lends itself to Hexagon and primitive shapes! So you don't really have to be a whiz-bang artist to be able to do interesting stuff.
I can model just about anything in clay or plasticene, but for me the digital approaches represented by Hex and Blender and UV maps (urrgh!) is a long, uphill battle. What about making a maquette in plasticene and then putting some of those laser hit markers or whatever they are, to generate at least a low-resolution, new mesh? I know it sounds like a "cart before the horse" sort of thing but clay is quick... if I start making (say) the roof of a dog house in Hexagon the sun will be going down before I even get one side done.
The other option I was thinking of just now is the less-refined or less-efficient approach: making the entire mesh out of little cubes or building blocks. Is there such a thing as digital Lego with enhanced "Snap To..." features say?
Attached, a physical doll I made once out of styrofoam, plasticene and polyvinyl ("Fimo") clay... there was a little choo-choo train in our window at Christmas -- would you believe the rolling stock for that imported stuff costs $125! Each!!! -- and someone said that the local merchants' group was offering a prize of $50,000 for the best window so off I went... silly me. Anyway the left boot took me about two or three hours of watching TV one evening -- you have to "knead" the clay for hours to make it soft enough to model with, arrgh -- and I did the right boot the following night, and so it went.
You can tell how old this is (about 20 years) by the antique cell phone and the VGA-quality, Mattel-type digital camera!
I like your Santa, Roman. Ironically, I can model in 3D but I can't model anything in Fimo. And I've tried. Lol. The best I can do is to smoosh the Fimo into a flat plane to cover a glass votive candle holder. So full snaps to you.
Basically, the EULA prohibits you from redistributing the mesh/textures, or making derivative works from said items.
I like your santa Roman. It's really cute. :)
Yesterday I spent the day looking for other utube videos in Hexagon and read some more in the user manual. :) I found a guy that has quit a few hexagon videos and I was just looked at four of them. He uses quit a few tools, short cuts, etc as he is modeling and he explains what he is doing as he goes. I need to take some notes for it to sink in. I thought they were good and worth looking through his other videos. https://www.youtube.com/user/TheEZhexagon/videos.
Now uvmaps are a pain in the butt in my opinion. Trying to figure out the proper place for seams and then fixing the uvmap in it's viewer so it looks good and can be painted is whole other ball game. I have to still figure out material zones yet. lol
You would be surprised how many times I sent that cow through hexagon as I was learning how to do things. I was determined to exhaust all possibilities. A person can make the 'morph' changes on her and get them into Daz and it works but the saving part is where Daz wants you to have the triax figure to save morphs, etc.This is what violates the EULA and copyright stuff, because then it changes the whole cow mesh and then she not a 'character' anymore of the old cow. She is her own new mesh totally not contected to the Daz cow if that makes sense. I mean it's ok. I have learned many things in this process, so it is not a bad thing for me. :)
The two worst things about this cow for me is her head shape. The forehead on a cow skull is more flat not curved. A person could say that is true of most grazing type and/or cloven hooved critters in general. Her uvmap is something to be desired for painting purposes, why the eyes bite to work with.
Edit: I should add that I used the hexagon bridge to bring in the morphed daz cow into daz and the morph showed up it just can not be saved.
I changed the thread name and welcome anyone to share renders of their cow, tips, and anything else for that matter that is ok according to EULA. :)
This is where clay excels - if the model is small enough to pick up, you just bang it down on the table top to flatten the forehead!
I did this head... er, shape just now, extruding from a cylinder, poking and tweaking. I will have a lot of questions in the near future: when I'm doing this I'm itching to go INSIDE the cylinder and push outwards! I want to lay down a thick piece of "digital clay" to make the chin jut out, arrrgh. Ears are child's play when you add them on separately, that sort of stuff.
The main thing for me with this first try was taking a guess at the resolution I wanted to work with... trying to hedge my bet for the placement of the eyes, nose and mouth... I very quickly saw that I could use more faces from the get-go, in order to do more detail. So I found out that "12 and 16" is too coarse, for the initial cylinder.
About Fimo and Sculpey clay - I went to this pop-up "Craft Show" one time and the place was filled with tiny kiosks showing little multi-colored, multi-piece figures, earrings and refrigerator magnets, wow! I knew right away that the color range was a real feature, really doable.The other two "big impetus" things for me were (A) Hallmark Corp. - they have been putting out tons of boomer nostalgia items, very intricate, as Christmas ornaments. Available on auction sites no doubt and very fun to look at. Also that company MacFarlane Toys that does licensed action figures. (B) was a book by Sue Heaser. Took me about 5 minutes to remember the name and... OMG she has a web page and there's LOTS of books! The one I looked at is the first one, top left.
http://www.sueheaser.com/polymer-clay-books.html
In the case of the little Santa -- the model is about 10 inches long say, and 4 inches high, (I can certainly take better quality images of it) -- I have very small hands and it's so easy for me to "twiddle" the clay using my thumbs and index fingers. I made all of the "toys" except for the "gold plated" trumpet which was mass-produced plastic... but I see Hexagon is really good at trumpets.
Ok, sounds reasonable. Any thoughts about laser-scanning a maquette (a small clay sculpture) on a turntable, to get a new cow mesh? I'm not insisting on doing it this way by any means, it's just a thought.
@ roman LOL I used the displacement brush on her forehead to make it (click on ctrl key) flatter and pull out (just use the brush) the sides more.
There is a teddy bear head utube video that starts from scratch that might be worth a look. It looks like you have a good start on your head though. :)
Laser-scanning a marquette of a cow is quite acceptable, as it's not derivative of the original Daz cow. It then beomes YOUR cow. ;)
Hmmm........ :)
if your real ones could stand still you could take a circle of photos and use 123Dcatch to make a mesh
Never heard of it, but it sounds interesting. As for the cows they never stand straight either, because they have to move to look and see what you are doing. I have none of them trained for cattle shows. lol
Ok, so I have been just working out all the possibilities or not with the original Daz cow. Of course, nothing that can be passed around and shared except the info. :(
I reassigned the shading domains in hexagon. That was an intersting endevor. I learned some more there. If I try to transfer the changes to daz it tries to make them into a morph which can not be saved yada, yada same story as above. I did go into daz and reassigned the polys using the geometry editor tool. That worked out ok, but can not be saved so it seems except as a scene only which is cool. :) The nose looks a bit funky because of how the polys are made so it is a bit jagged in areas. I did get the dew claws connected with the hooves and I made the pupil bigger by reassigning polys from the eyeball or I think it is called the iris on the cow. I have some pictures of my fun. I am thinking about making them some hair by creating a displacement map. It won't be fancy because of the uvmap, but at least the brown cow will not look too 'bald' as Fey called her. lol
Liana - have you tried converting the mesh to SubD? Granted you won't be able to save the Poser rigged cow (unless you save it as a scene file), but at least the mesh can be converted to a higher level of "realism" by doing so. (Click on the drop down menu in the scene tab, scroll down to edit, click on geometry, and the first selection available is Convert to SubD.) This will change the cow's mesh from the base level to a high resolution, which you can access that information in the parameters tab. This might also help with that "jagged" look in the nose you were speaking of.
Ohhh...I didn't think of that this time. Thanks! :)
I have encountered the notion of "mesh density" once or twice. I don't understand it! It seems to be related to picking a good "working size" for a given model at the outset? People on Youtube and so on seem to do good work with polygons that are spaced quite far apart (like the little bear)... I think I would prefer to have a tighter looking mesh. And what's with the curved edges??! They often don't match what I would consider to be a reasonable contour drawing, as in at all. If (through some magic or voodoo that escapes me at the moment) all these folks are able to put detailed features on such a... PLAIN area as the little bear's face then why do we need a denser mesh, again? Again left to my own devices and imaginings I think I would want to be a "detailed mesh" person but many full-featured models seem to be extruded from wide-open, very loose mesh. Perhaps at some point you set aside the mesh and the texture or shader comes into play, or takes over?
Before getting in to any really detailed digital modelling I have been trying some "nip and tuck" operations -- just pulling or pushing a vertex or two, on a simple primitive surface -- to see how these little changes show up when shaded and rendered in DAZ Studio. Ergo if I put in such and such little surface anomaly or inconsistency, how does that play out in the long run? So far the results have been inconclusive.
Also, I don't understand extruding vs. just tacking something on. In the case of the little bear it seems to me to be a much simpler proposition to just stick on a lump of clay (as it were) to make the "ear", rather than risk messing up the base mesh... and in this screen shot here it seems to me that the ideal place for the future right eye would be smack dab on a VERTEX - that makes sense in many ways and resembles traditional contour drawing. The LEFT EYE on the other hand seems to me to want to be in the middle of a polygon, close to an edge perhaps but nowhere near a vertex. Hard for me to sort out, in my "minds" eye, heh.
Part of the reason for extruding out or in a surface is too eliminate from my experience 'seams' and and another artifact which the word is escaping me at the moment. The later causes a shimmering effect a person does not want. Now granted most of my modeling work has been done in sketchup doing furniture and architect type (doors, windows) models. Which I had to make very low poly and did a lot of texture work to make look even more 3D. This was all due to the 3D 'platform' I was making stuff for. The more things have curves and organic type shapes there is more of a need to be higher poly/denser mesh to make it look good.
I don't things have to be super high poly, which would be your tighter/dense mesh as you call it than the bear, which is obviously workable. :) The higher the poly and texture size the harder it is for your pc to 'run' it so to speak. Why the 3D game/chat I made stuff for it was really important to do low poly (some went too far to this extreme and made for ugly items). The important part is to at least find a happy medium in poly count, make a detailed mesh meaning you have all the things that make it look good ( Ears, eyes, legs, arms, nose, body, head, maybe a bow tie), and make sure your mesh has a good uvmap for texturing. The easier it is to texture an item the more detail a person can get by adding like inner ear color, better eye texture, separate nose texture, etc. In my learning here I believe that is where the shading domains (in hexagon)/surfaces (in daz) come in pretty handy for retexturing an item. I am still working that all out yet. :P This all leads to a better the product in the long run. I have always believed a person should really learn to texture so they can be better modelers of meshes.
As for nipping/tucking or pulling things up and out using the vertices, faces, or edges is what helps make the shape more refined. I was doing that with the old daz cow until I found out I could not save my changes as a morph due to her being a poser rigged figure. Even with this if you use the smoothing or the displacement tool helps keeps things not so ridged. This guy on utube explains a few things as he works in hexagon and he has loads of those videos. https://www.youtube.com/channel/UCe7aOH3JhCC47gieU1ExLzg I know I am going to go back and look at some more of his videos. I have a few things I need to sort out modeling wise. :)
I hope i did not confuse you more. I know it takes times to get all of this stuff stright in my head anyways.I am some what like you what works or is in real life is slightly different doing it in 3D. I have a hard time with that too. lol :P
The old daz cow she ain't what she used to be...... haha
At this point I subdivided the cow like Fey suggested it sort of helped out the jagged poly edges on the nose. I reassigned the polys in daz so the dew claw is connected with the hooves which is the same "material", parts of the nose before is now the fur, and I added to the pupil from the iris a small area. I have been working on painting the uvmap by making hairy parts. We will see how that works out. It is not bad until I get to the hooves, dew claws, the parts of the udder that don't have hair everything is way too small and scrunched, the ears are way to small to paint properly, and lastly the eyes could be a challenge due to their unwrapping. I have not done anything with the eyes yet. I thought if I could get a good displacement map then she would look a little better. Plus I need to have more practice painting hairy/ furry things. :)
As far as improvements on the Daz cow whatever we do in Daz can be saved as scene and then you can merge her into whatever scene you like. Anything outside of daz even through the hexagon bridge will be lost even saving as a scene. I have saved my lonely daz cow as a scene so my poly reassignment changes are saved at least. Hopefully, what I have done/working on will make her a good background filler cow for a whole herd. :)
Once done with the displacement map and some coloring. I am going to move on to the triax cow I was able to create and mold her into something interesting for at least my own use and I will post that here.
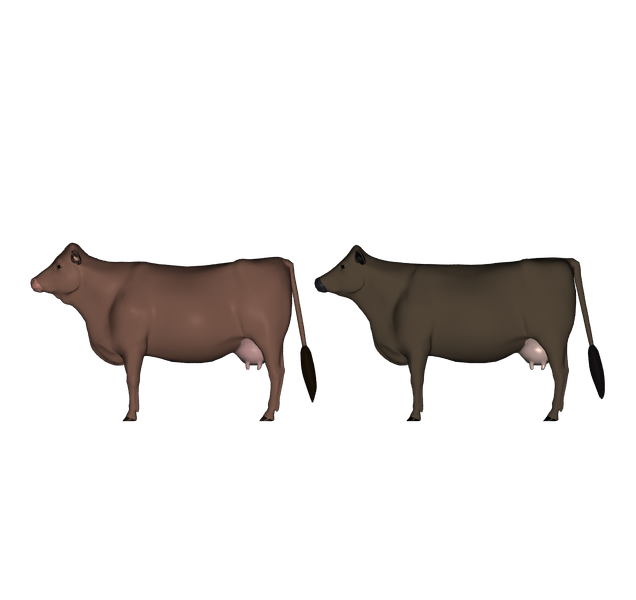
I have named the reassigned poly cow, Polly. This is her and her other friend named Polly merged into this scene together. :)
Hi Roman. Allow me to explain the difference between extruding and tacking something on. While Liana did a pretty good of explaining it, she didn't cover the importances of having the mesh welded. Extruding the mesh to create the ear, for example, would mean that the ear part is integral to the mesh of the entire model. Tacking on another part means that the new add-on part isn't welded, or an actual part of the original mesh.
For basic intents and purposes, there's no reason why you can't just tack something on to another. However if you plan on doing morphs for said figure, or you even plan to do a 3D print of your creation, if the mesh isn't welded, then you will have some serious isses that will impair your final project.
That's not to say you can't still tack something on, as long as you weld the mesh, and leave no gaps. Then that would be fine, as the section then becomes part of the whole, and you won't have the gapping that would occur in morphing or printing or rendering weird artifacts.
Does that make sense?
The thing about making digital things is that you have to kind of divorce your mind from thinking about making it in real world terms, like your clay creations. Sometimes, the concepts work and in some cases work very well, but in other situations there are better ways of making 3D models that go against intuition. :) It's a process to learn which works best and to be open to trying to do things in a different manner than you would normally approach them.
Now, to address mesh density. Where to begin? Lol. OK, so there are low poly meshes and high poly meshes and sometimes they're from the same figure. In certain situations you want a low poly mesh - video games for one example. Another would be lack of resources on your computer. The higher the poly count the more your computer has to work to compute how it looks when its rendered. In most situations you want to start out with a lower poly mesh (more space between the lines) because then you've got your low poly mesh that you know looks good on a slow machine and doesn't take up much in the way of resources. Then you move up to things like in DS where you want a certain amount of realism. So you use LOD (levels of density) and SubD (sub-division). What happens is that when you add sub-division/LOD, each square in your initial low poly model gets divided into four squares. So each level you go up, your entire poly count goes up by a factor of four, exponentially (I believe that is the math-speak here). In addition to breaking each face into four smaller faces, the spaces between the points gets recaculated and smoothed out. This is why higher LOD meshes look more rounded, or polished. I think you can get away with a LOD of 4 in DS before things start to go wonky. But other programs like Z-Brush can take a mesh to insane levels of mesh density to get really amazing details.
The HD line of products in the store are all high density meshes that have been brought into DS via a special means so that DS doesn't explode. What's really going on is that a high resolution model with a LOD of maybe 2 - 4 has been made to accept a HD (high definition) morph (usually made in ZBrush, but I know it can also be made in other modelers, Hex even) via a Daz special plug-in that gets DS's high resolution mesh to basically handshake with the HD morph in such a way that it doesn't overload the system. It's actually quite ingenious.
But anyway. That's a long-winded way of explaining that low polys are for meshes with little to no detail (or good as a base to start for making more details on higher density meshes) and high polys are for meshes with more realistic detailing. And HD morphs are for the crazy insane details like individual hairs or wrinkles on a character's face.
Does that explain it a bit better?
I liked the explanation Fey. I forgot about the welding part after experiencing the daz cow falling apart. Thanks for going to the effort of explaining what you know to all of us beginners. :)
Oh no worries, Cow Girl. I'm happy to help. We all had to start some place and I had some amazing mentors as I learned these things. (I still have some amazing mentors helping me even now.) I'd like to think that I'm returning the favor and paying it forward.
Actually, I think it's a good idea to periodically come into the New Users forum and lend a hand. Not only am I helping others, I'm also getting a refresher course in some of the stuff I don't do on a regular basis for my sets. So it's actually a win-win situation. Plus, it allows me to mingle with my customers and get a feel for what they'd like to see in the market.
I guessss.... good enough for me to save it kind of permanently, in my Hex documentation folder. The part where you state "this is why higher LOD meshes look more rounded, or polished" may help explain something that *I think* I've been noticing about some of this stuff. The part about giving up clay hurts but what can I do, weep weep weep. Thanks!
So OTTOMH once you weld, there are some "lossy" or "point of no return" issues - like you may not be able to go back in time to your original construction, I get it.
If I glue four wooden cubes together to make a larger cube, I guess I lose access to some faces, more or less permanently. What about in Hexagon... if I "group" things (like four cubes) temporarily or weld or connect them or whatever, what happens to the resulting edges that are inside the "large" parent cube, and the single vertex that's lodged there? Still good for anything like maybe a perfect "pivot" or center point, or perhaps helping to "anchor" sweeps and warps that you might be making on the external facets? I don't remember the word "pin" being used in Hexagon, eg. to hold a vertex or edge to a fixed point in 3-D space regardless.
----------
In other notes I just saw some "merchant" offerings on another site where they are definitely putting a guy on a stool on a turntable, and they are scanning him in some way to make expression morphs I think, to use on G3 figures. And on yeh another site, there are cows in .OBJ format that cost $500, even $1,000 US! So I've at least had a look at some of the high-end meshes, heh.
It just occurred to me that one reason to keep the clay is... say you don't understand the lower eyelid or some other body part. What then? You can hit the bookstore for Burne Hogarth's simplified, generic sketches (Amazon link) or you can roll out some clay and make (1) a ball and (2) a flat piece of clay about 1/8 inch or 3 mm thick say. Cut a shallow crescent away from the flat piece, then press your resulting "eyelid" against the ball. Presto - a 3-D "eyeball" with lid that you can look at from various angles. You can also pad the underside of the "lid" to puff it out a bit, etc.
This kind of learning process is useful too!
I also usually keep a skull or two around as well, and there are horse and cow skeleton kits... plastic of course; the real thing is a bit too creepy.
Bingo. I made progress just now. First time ever. Real hard to think like a Hexagon modeller - it's really not my bag! Btw I do have the DAZ "barn"... this is a dog house!
What finally "clicked" for me (after all these years LOL) was watching Gary Miller on Youtube and he split a cube then drew down two opposing faces to achieve a sloping roof. Once I copied that technique I was off and running!
Good work Roman. :) Yea, I find hexagon is probably not the best for architecture/building type stuff. I think I am going to switch gears and work in Blender for that. Trying to make windows and doors even after watching his video with hexagon seems a challenge and it should not be. I feel Hexagon is not set-up to handle anything with thickness in the walls when adding things. It needs a different approach. Plus it seriously needs be a 64 bit program not 32 bit. I have crashed it several times now doing more complecated things it did not like. I suspect after reading some in the hexagon forums, Daz either does not have the "person" to do the job or has just decided to not bother, which is a real shame considering the interface is pretty easy and clear. It just needs to be upgraded to 64 bit and some of the tools refined. *shrugs*
YEA!!! I am doing my happy dance for you. OK, it's more like a happy dance with my upper body at the moment. I injured my hip and it's acting up pretty bad this evening (and before you say anything Liana, I know. I should've taken it easy today.) but in truth I am very happy for you. It's always a wonderful feeling when things click and you are finally able to take a step forward. I'm trying to do this myself with Modo. I've had it for a year now, and I'm struggling with it. But working with Liana, I'm actually making progress in this regard.
Awwww.. Glad I can help in some way even though I know zippo in Modo. LOL
Goes back to making walls :P
Thanks ladies... as I've told all and sundry many times, I believe I've D/L or bought just about all of the Hexagon tutorials, but I've actually watched fewer than 5 percent of them - and I've acted on even fewer. With Blender I'm in the "0.005..." percentage range, LOL. I've read a lot of comments,some very detailed and thoughtful, about what's good for organic modelling and what isn't... in my story line for the dog house I actually want to TRASH it, or at least warp it a bit and admit chinks of light like in an old (North American) cow barn... ergo I am sure they do things differently in other countries.
So I think I'm going to try "filling" the shape of the doghouse with the same thing made out of planks or boards that I can bend individually. Tesellating and then dis-associating a plank makes two separate pieces floating in the same space right? And from there it's easy to move/rotate each piece just a tiny bit.
I'm also excited to be getting close to where I can extrude the rough limbs of a quadruped animal - at least to cartoon resolution.
About the thickness of the walls of a structure, and cutting out doors and windows... perhaps you missed my recent illustration (attached) where I made a piece of "wall" visibly thick on purpose, and then you take the top face and Fast Extrude it, dragging it up and over and down, clockwise, to make... wait for it!... a door. If you think about it bridging the last face (after a bit of further tesellation) quickly yields a simple window, no?
Just a thought... as I say for me this is a bizarre way of working but "I thought it up all by myself". One final word: HYDROTHERAPY! Keep warm.
Actually, I have been doing some organic modeling lately or trying. I have not got back to the cow uvmap painting yet. I am kind of on a roll in modeling so I am just going with the flow. LOL
I upgraded my Blender to 2.78a and it has some new cool features. They look cool not sure how useful they will be for here in the end, but I will see. I got one of those moments if clarity on what I was looking and trying to do so it is a huge leap forward. :)
I made Polly a water trough :)
Here's me trying similar, in Hexagon. I don't have the right "wood" shader or texture here, just trying the stock Iray mahogany shader in DS 4.8. I'm also continuing my attempts to warp the boards a bit, and to "chamfer" them. Hmmm, not that great.