Iray Burn & Crush Settings - Advice for Optimizing?
 will.barger.arts
Posts: 60
will.barger.arts
Posts: 60
Does anyone here have rigorous experience they’d like to share on:
1) How exactly the Burn Highlights and Crush Blacks function within Iray Tone Mapping works; and
2) How one should go about adjusting those functions to minimize post-rendering work for image-series “animations” where the lighting and camera angles, etc., don’t change from job to job, but only the Characters, Clothes, Poses, etc.?
I'm not new to CG, but am a bit of a newbie with Daz Studio. At first, I thought the default Burn and Crush settings might be a good “backstop” and help me keep exposure within proper limits “at the margin”. And it DOES do that.
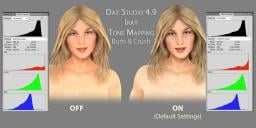
But as I tweaked some lighting even past barely perceptible improvements for a scene that will be re-rendered with some frequency, I kept noticing that something didn’t quite look right. So I ran a test by rendering the exact same scene WITH and WITHOUT the Burn and Crush functions on, and then put a Histogram on them in Photoshop.
See the results in the attached image.
Sure enough, especially the Burn Highlights function seems to be “shaving off” Red intensity just enough to fowl exposure by about 1/4 to 1/3 stop, and therefore creates a bit of an undesirable (to me) color shift.
Much of our work involves recreating *exactly* (as much as possible) the real-life appearance of the fabric colors and textures in apparel, so little shifts like this are a problem. (The client understandably expects “spot on” exposure and color, even if it gets twisted a dozen times before it shows up on a given Consumer’s screen. Plus, our Clients often do a lot of their own compositing and other post-work, and they shouldn’t have to spend any time “fixing” our work – only adapting it to their particular needs and aesthetic.)
Any well-informed opinions and advice?
Thanks for your interest and help …
WILL BARGER
Daz 3D is part of 
Connect
DAZ Productions, Inc.
7533 S Center View Ct #4664
West Jordan, UT 84084
Licensing Agreement | Terms of Service | Privacy Policy | EULA
© 2025 Daz Productions Inc. All Rights Reserved.
Comments
Higher values on Crush Blacks deepens the darker areas of the render whereas smaller values on highlights tones down the brighter and whiter areas of the render. Changing the color to to a very pale yellow/green for instance on the White Point shifts the color more toward blue and can be adjusted according to your needs depending on what color you change the white point to.
Laurie
Thanks for the info, AllenArt.
Based upon the ratio of Commenters v. Viewers on this Post, I'm starting to think this may be a fairly arcane topic. :-)
It's a subject I need to learn, moving this white point, as I have some very old faded color photos and negatives than need scanned and adjusted.
If you want maximum postwork control over exposure, render as a Beauty canvas, and then open the 32-bit EXRs that result in Photoshop. There you can tone map over the entire 32-bit range.
For the most flexibility, turn Tone Mapping off in Iray, and provide the engine with an exposure hint by fiddling with the Nominal Luminance control. This control isn't required when tone mapping is on.
Thanks, Tobor.
Yeah, we plan to use Canvas functionality and masks for post-render processing quite a bit.
One thing I liked about Tone Mapping was the ability to get the *balance* of intensity among light sources "right", and then "dial in" exposure for the lot of them with the Exposure Value (EV) setting. (Does it show that I'm an "old school" photography guy from the days of heated chemicals and foul fumes? :)
I'll explore the Nominal Luminance function you mentioned. It sounds like a potential substitute for the EV in Tone Mapping.
Just started experimenting with tonemapping using Tonal Rage by @DimensionTheory. Some of the promo images even list the settings from the product used to get the effects. Sorry I can't be of more help.
Tone mapping is one of those things that a lot of people don't play with and I think they are missing out on a valuable tool. It can really add to a render especially if you aren't good at post work yet. Tonal Rage is the product that got me addicted to playing with tone mapping. Now, every render I do gets some tone mapping adjustments. I love playing with the tone mapping settings on my own now, too, not just using Tonal Rage. For those who like a one click preset, DimensionTheory has a LOT of presets in there. It is definitely an undervalued tool in Iray. Along with Crush Blacks and Burn Highlights, even small adjustments to Saturation and Gamma can help a render in Iray.