Nail System Cornfusion
 ebergerly
Posts: 3,255
ebergerly
Posts: 3,255
Now i don't want to criticize, but seriously...
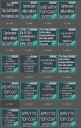
There is a fingernail shader system I purchased (Nail System Genesis 3), and every time I try to apply the fingernail polish to a G3 I end up spending 10 minutes trying to figure out how to do it. And the image below are the "hint" icons that appear in Smart Content for the product. There's a "Shader System" and a "Top Coat System" and you can only apply some shaders to one and not the other, but apparently have to do it in exactly the correct procedure.
Now, the "hint" icons say they're "Scripts", but when I click on them it takes me to the DAZ store website in my browser. And trying to figure out what the "hints" mean gives me a headache.
It can't be that difficult. But every time I try the nails refuse to change to the colors I select. And after I've applied it, for some reason later on after I've worked on the scene for weeks, suddenly they've changed back to this clear, transparent color.
Geez.
Sorry, having a frustrating day.
Daz 3D is part of 
Connect
DAZ Productions, Inc.
7533 S Center View Ct #4664
West Jordan, UT 84084
Licensing Agreement | Terms of Service | Privacy Policy | EULA
© 2025 Daz Productions Inc. All Rights Reserved.
Comments
That might be part of your problem — when this sort of product is set up, frequently the different types of scripts and content files are put in different subfolders in the actual physical files stored on your computer. Smart Content (which unfortunately isn't always) is not a view of your actual content, it's a sorted and filtered view of a database of links to your content. If the metadata that goes into the content database isn't set up right to preserve this subfolder organisation, it smushes every item in the product into one grand mess, ignoring any subfolders that organise the different bits and pieces. Have a look at the same item in the Content Library tab instead of Smart Content, and see if it makes any more sense.
Right click on the file in Smart Content and use Show Asset In>Content Library > Virtual folder (if it was installed by Connect) or Show Asset In> Content Library > Mapped folder (if isntalled via DIM) to do as Spotted Kitty suggests
Thanks. The only place I found reference to that set in Content Library was under Products, and under "N" for Nail System it had one folder with about 200 icons all smushed togther, just like Smart Content.
Strange that I couldn't find it in the regular area of Content Library, like under Materials or something.
Anyway I think I got it to work. I looked thru all the icons/hints/scripts and found one to remove/reset the Top Coat. I clicked on that, then clicked on the color I wanted, and it worked. Not quite sure why, but I'll worry about that next time.
They set up a folder system hierarchy for better implementation of the product's settings. According to the Read Me, you should be able to find the files under:
People >> Genesis 3 Female >> Anatomy >> Nail System Genesis 3 Female
As far as I can tell, with products like this, the folder system should walk you through the settings better. :)
Interesting...now there's a concept...
Maybe I should actually read the instructions
(I'm trying to find an "embarassed" smiley to insert here...)
Come to think of it, is it actually possible to shoehorn Smart Content into mirroring a subfolder hierarchy in the Content Library? That smushed-all-together display is just like similar messes people have posted queries about since way back when Smart Content was first introduced — and that was more than enough to persuade me to forget about the whole idea and stick with the Content Library I was familiar with.
I just don't understand why there are like 30 icons with hints on how to use the thing, instead of ONE icon you click on and it jumps you to a web page which clear instructions.
I've looked at those hints like 10 times and still can't figure them out. There's "Hint" and "Hint 3" and on and on.
I don't consider it a Smart Content or Content Library issue, just a poor implementation of simple instructions.
Geez.
If you were in the folder hierarchy the hints would be with the matching presets
I have this and Richard is right, I loaded it with DIM and its much more understandable in the content library format that provided than what you have posted happened with Smart Content.
And Products in the Content Library pane uses the database just like stupid Smart Content so if it doesn't work in Smart Content it is not going to work in Products.
Products is just a flat view of al the files. As I said above, you can use the Mapped folder for DIM Installs or the Virtual Folder for Connect Installs to see the hierarchical view, which can be reached from the database views via a right-click. Shadrs often need to be accessed this way, as do some pose sets.
Geez, I'm sorry, but this is the poorest excuse for a shader set I've ever encountered. Now I'm a reasonably intelligent guy, and I've spent the last 1/2 hour going thru the Smart Content and Content Library and following all the suggestions here, and for the life of me I can't find the magic set of steps to simply change the shader on a set of nails. A while back I got lucky and it worked, but everytime I venture into this insanity it's another 45 minutes of throwing up my hands.
There's the Nail System and Top Coat System and you can reset the Top Coat or Turn Off the Top Coat or Use the Top Coat with the other shaders or choose not to use the top coat and there's 30 "hints" and some of them load the DAZ shopping page and others seem to do nothing and on and on.
No matter what I do the nails are some transparent glass-looking shader. I tried to turn off and reset the top coat and apply the color I want, but apparently you can only turn off the top coat on an individual nail.
Geez. There's Scripts and Shaders and Properties and Materials. I give up. I'll just make my own shaders and toss this in the trash.
You do realize that this is a set of conforming nails that have to be applied to G3F first (see divamakeup's post)? The shaders then apply to the nails conformer not G3F so you have to that selected.
Yeah, thanks, I've got all that. The remaining issue is the simple steps, once that's all done, to apply a simple shader from the set to the conforming nails. It's not as simple as choosing the Nail System object, then selecting the associated Surfaces, and double clicking on one of the many nail shaders.
Yes it is, in Smart Content make sure you are have Files highlighted not Products.
omg THANK YOU Richard! Holy heck, that has been driving me nuts for the "thigh highs and stockings for Gen3/Gen8". The metadata has everything in one folder, so you have no idea how to apply them - base colour, then design etc. I've been opening up data -> cloud -> sku etc and then going back and forth to figure that product out. Had no idea about the "virtual folder"!!!
Does anyone know how to apply the morph lengths to both hands?
I have a problem with my nails as well...In some environments they become transparend. Does someone have an idea what I can do?
Here's the Fix:
The product's "top coat system" is a geometry shell that sits on top of the "nail system" nails. If you expand the Nail System node in the Scene tab you'll see the Top Coat System node. Select it and go to the Parameters tab. Expand the General section and change the Mesh Offset from 0.001 to 0.01. The original mesh offset is too close to the underlying geometry on some characters and causes weird rendering issues by partially/fully blocking the underlying material.
Other Tips:
Finally got color on the nails but spent several hours on this and can only get the left hand to change nail length???? so have a character with two different nail lengths... frustrated AF!