Rigging issue
Daz 3D Forums > General > New Users>Rigging issue
Rigging issue
in New Users
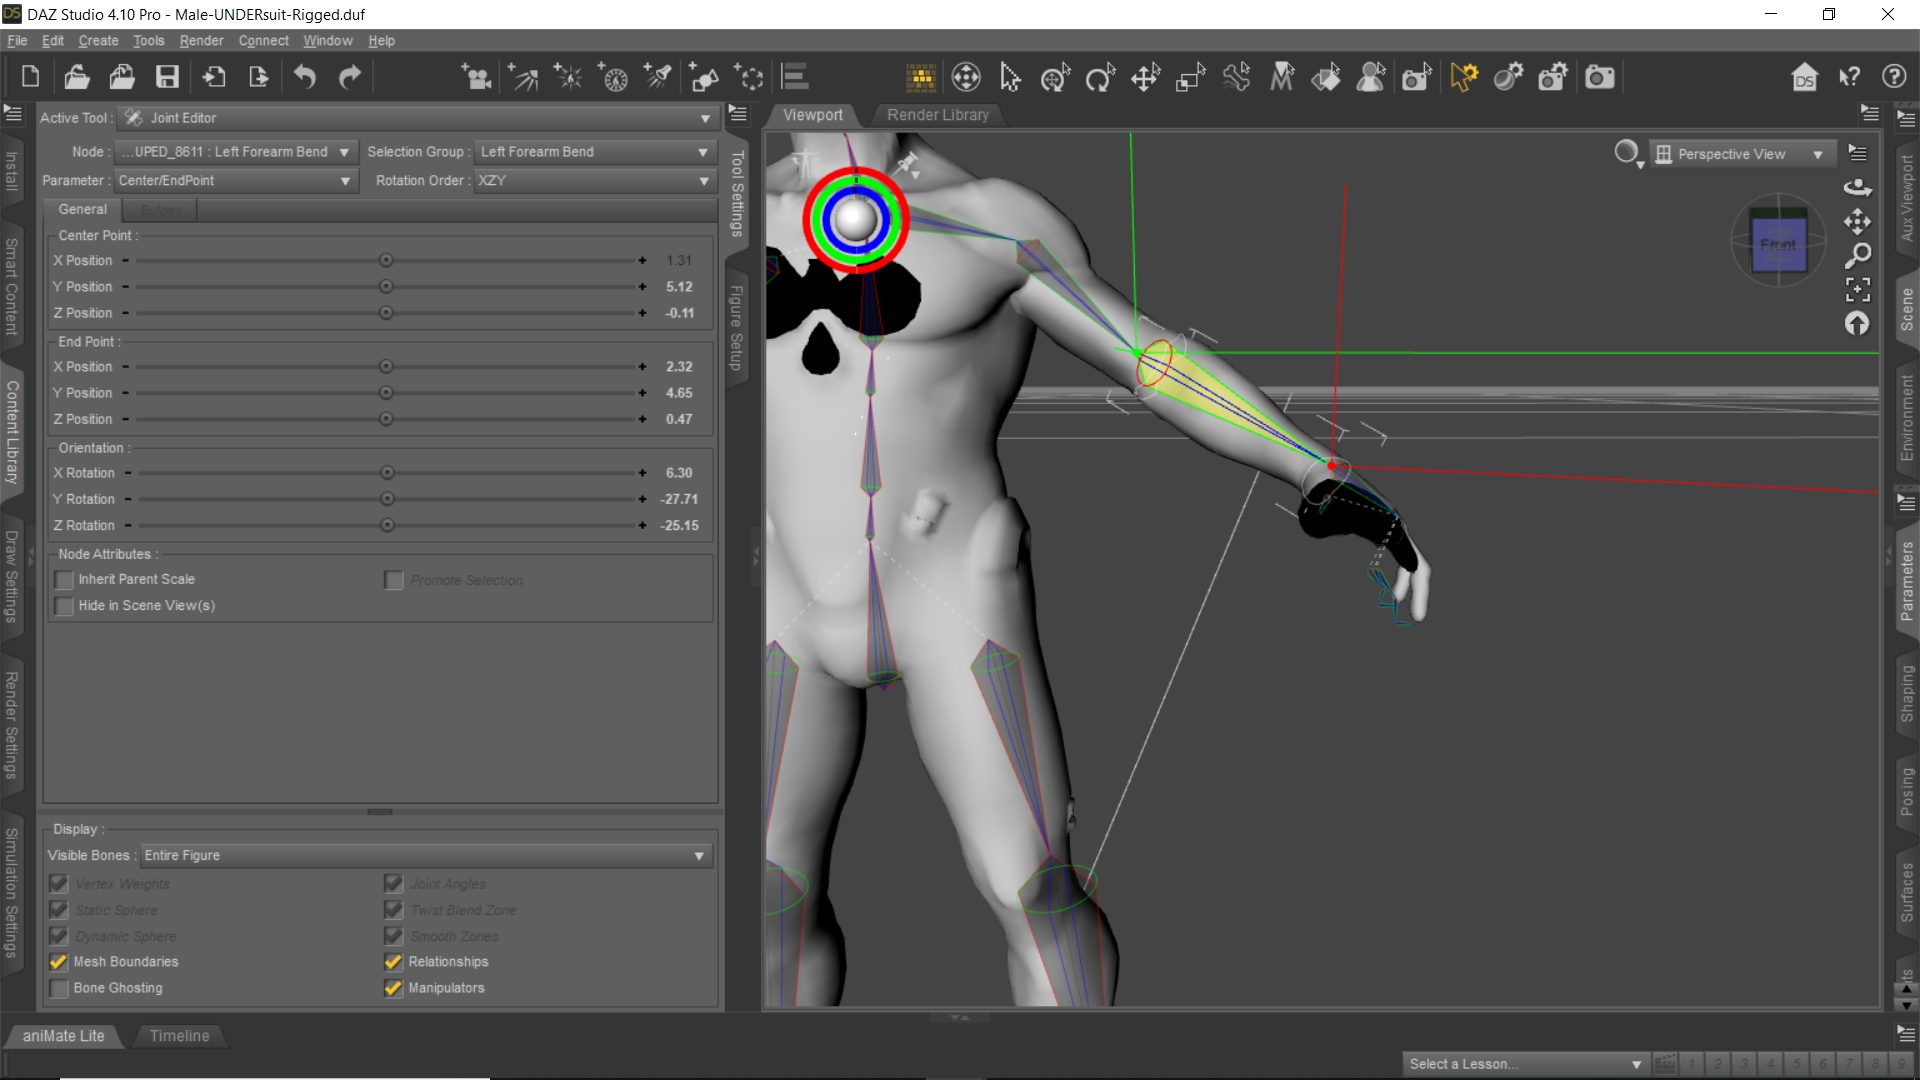
Hoping someone can help. I do believe that I can finish aligning the bones in the hand as is, but tried zooming in on the hand and it tends to just go out of focus.(VERY ANNOYING) Any suggestions?


Male-RiggedSuit.png
1920 x 1080 - 473K


Comments
Try pressing Ctrl+F for to frame the selection. The Mouse Wheel Zoom always jumps some degeree, sometimes this is too far. You can use the View Control "gizmo" in the upper right corner to zoom stepless on smale parts like the fingers. You could also customize the Mouse Button Modifiers for the View Control to zoom with pressing some keyboard 'modifier' key and a mousebutton and then move the mouse. My settings are Alt+MiddleMouseButton to Zoom (Dolly) this is zooming and panning the same time. The settings can be changed in Windows > Workspace > Customize.
But as I worked in the Joint Editor lately I also got this annoying "jumps" while I tried to pan sideways, pressing Ctrl+F gets you back on the selection. Maybe there is a bug with the Joint Editor and panning in DS v4.10.0.123.
You should be able to pan even in Orthoraphic views like Left, Right, Front... the thing you can't do in there is orbit.
I wonder what you are doing there in the screenshot, it seems it is not a default genesis figure but you are working on a Bodysuit.
Before you do anything wrong here are some advices:
model the clothing to match the base shape of the figure, to fit clothing mesh on figures use the Transfer Utility, in the Joint editor there is also a command Transfer Rigging (Figure Space) both the Figure then holding Ctrl and the Clothing have to be selected in that order to transfer the joint possitions.
Over the years I became an expert for the Daz Studio Viewport navigation controlls. If you like to know more about how to customize Daz Studio have a look at my thread.
How to Customize Daz Studio - to speed up Workflow!? [WIP]
Viewport Navigation Guide + My custom Mouse Button Modifiers
Changing Mouse Button Modifiers (open Windows > Workspace > Customize)
I also did some youtube videos about rigging. Maybe those can help you, even though those don't count as tutorials.
DazStudio Rigging a Cylinder
DazStudio Twi'lek for G8F 01 Editing ZarconDeeGrissom's Version
OK then. Keep in mind in order 'Fit' the clothing to the figure you are using, the bones have to be in the same spot. If you are just using the rig of the other figure to pose and animate the Halo 5 Male techsuit without a figure inside, thats fine. I just wodered why there are these black poke throughs in the screenshot.
In the videos you see I use the Figure Setup pane alot. If the Face Groups are setup correctly with the Geometry Editor and the Bone Rotation Order is set right in the Figure Setup pane, the bones get alinged automaticly. This gives you a good starting point for adjusting the alingment. Later if the weight map is filled By Bone Selection Group I would start to bend the joints and see if they need some more adjustment. You just have to do one side and you can copy the joints to the other side with right-click Edit > Mirror Joints.
LOL, yeah those black holes is what it looks like when I've reached the point at which I can't zoom in any closer. It's like a invisible barrier cutting into the mesh of the figure. Hmmm, making me start to wonder if I set some of the rotations the wrong way? I mean the arm bones looked good but they just didn't seem to fall in place on the inside of the techsuit after hitting aligh all bones. Also, following through with Blondies9999 's Rigging Original Figures.
Issue:
Now I get what is wrong, you are using a way too smale scle for the Halo 5 Male techsuit. You must have imported it in the wrong scaling compared to a default Genesis figure. You can also see it by the Floor grid the distance to the next grid line seems very far away behind the figure. The distance from one grid line to the next is 1 Meter. I guess your Halo 5 Male techsuit figure is currently about 10 cm high like a plastic toy figure. Thasts why you get all kinds of issues by zooming and such and the controlls acting too sensitive. The "invisible barrier cutting into the mesh" is actualy called the clipping distance of the Persepective view. You don't have this in the Orthographic views. The clipping distance tells the view to hide geometry that is too close to the Persepective or Camera view. Even on regular scale this clipping distance sometimes seems too big but you can't control it there is no setting for it. On Cameras you can change the Frame With and the clipping distance will become less noticable.
Solution:
Also load in a Geneisis figure into the scene, scale the Halo 5 Male techsuit up with the general scaling transformation in Parameters pane until its about the same size of the Genesis Figure. Next hide everything but the techsuit and export this mesh as OBJ keep an eye on the export Scale should be Daz Default Scale 100% (1 unit = 1 cm). But instead of starting over to rig this new mesh you could try the following. Open the Morph Loader Pro and load the exported OBJ mesh with the native Daz scaling as a morph and dial it up on the current figure. Next go to the Joint Editor and choose Adjust Rigging to Shape this should fix the current rig representing the propper scale. Then go to the Joint Editor Tool Settings pane and Memorize Figure Rigging. Next go to Edit > Figure > Geometry > Update Geometry and choose the exported OBJ. Again choose the Daz Default Scale 100% (1 unit = 1 cm) now everything the rig and the mesh is fixed to the propper Daz scaling. You can still use the morph you created as a "reverse shape" by dialing it downt to -100% and you get the toy figure scaling from before if that was what you intended to do.
So, I tried the solution that you mentioned but it didn't work. After exporting then re-importing the model is it supposed to still have all of the groups and bones that I gave it? Also, was wondering if there is a better way to manipulate the bones in the fingers. I would think the one could just select group/joint of the finger then select the bone then select a option that would snap the bone into position? If you'd like I could package the scene file up so you could check it out. The only issue with packaging it up, is that I don't know how to do that. Let me know what ya think.
Forget what I mentioned about manipulating the bones, it just took some getting use to moving the bones around.
Hi, sorry wasn't around this weekend. I'm glad you found a way to work with the Geometry Editor.
Yeah it would be great if you could have a function like in the Figure Setup pane that aligns only your selected bones automaticly to the Face Group.
Maybe my solution I suggested is not applicable in your case. It is just an example how you could fix scaling on a already rigged figure. Actualy by reading over it a second time I realized it is enougth to scale up the toy size figure to work on the rigging and scale it down to 100% when done. It was just my second guess that you wanted the figure in toy size by default. However I wonder how you got it imported into DazStudio in the first place, I guess you have imported a FBX file from the blender tech suit.
Anyway exporting OBJs can help sometimes especialy if you want to create morphs in other applications. By exporting the OBJ check the Individual Settings, have a look at the screenshot, maybe they are set wrong by default. Heared from others they had issues with exporting the OBJ with Groups. Make shure Write Groups and Use Existing Groups is selected. Regarding the Bones they don't get saved with the OBJ file format - rigging is not supported. This is why it dosn't make sense to import the OBJ again into the scene. I was suggesting to load the OBJ as a morph target with Morph Loader Pro or you could load this OBJ into the Figure Setup pane to have the bones autogenerated and aligned.
The only thing I could think of why this wasn't working are the bone labels. The Mirror Joint options show the left-right prefixes at the bottom. Use the settings Node: Root Recursice and Direction: Left to Right or Right to Left. The settings Selected... and To Opposite Side never worked for me. The bones should include left/right, Left/Right, l/r or L/R in front of the Label (not the internal Name) followed by a space, so DS can detect to which side the bone belongs. Lateron this is also used by the Symmetry Pose function Ctrl+Y. To change the nodes (bones) name/label there is an option in the Joint Editor called Rename Node.
hmmm, no luck.