I just don't get Iray
 dracorn
Posts: 2,345
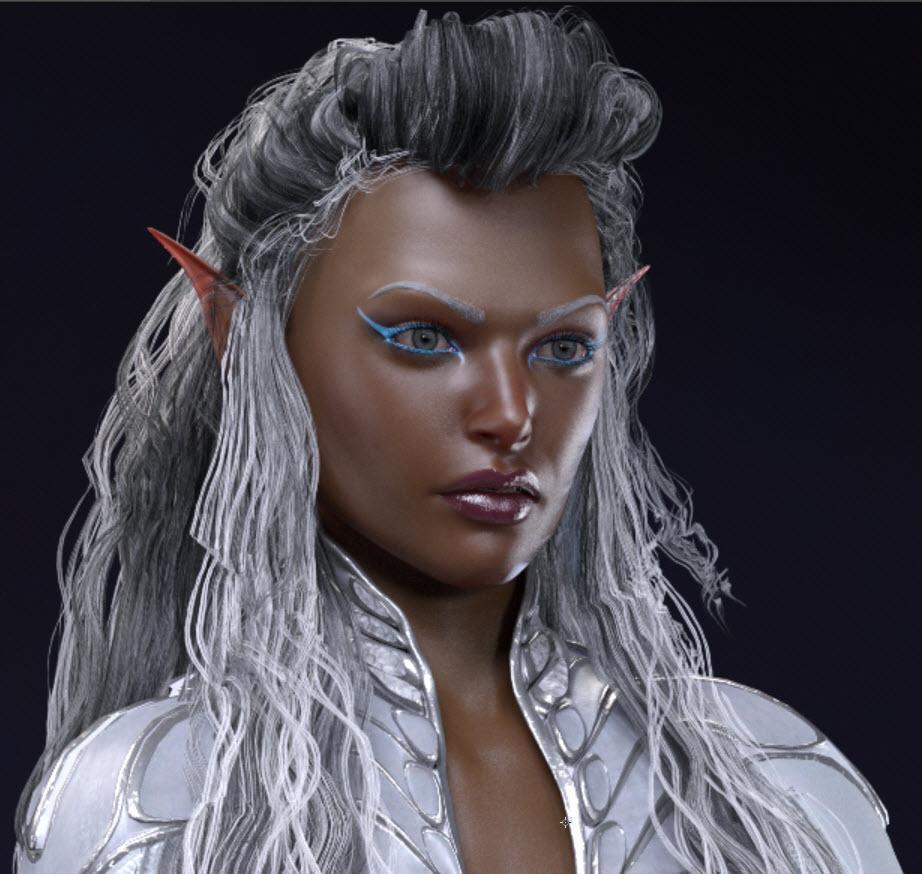
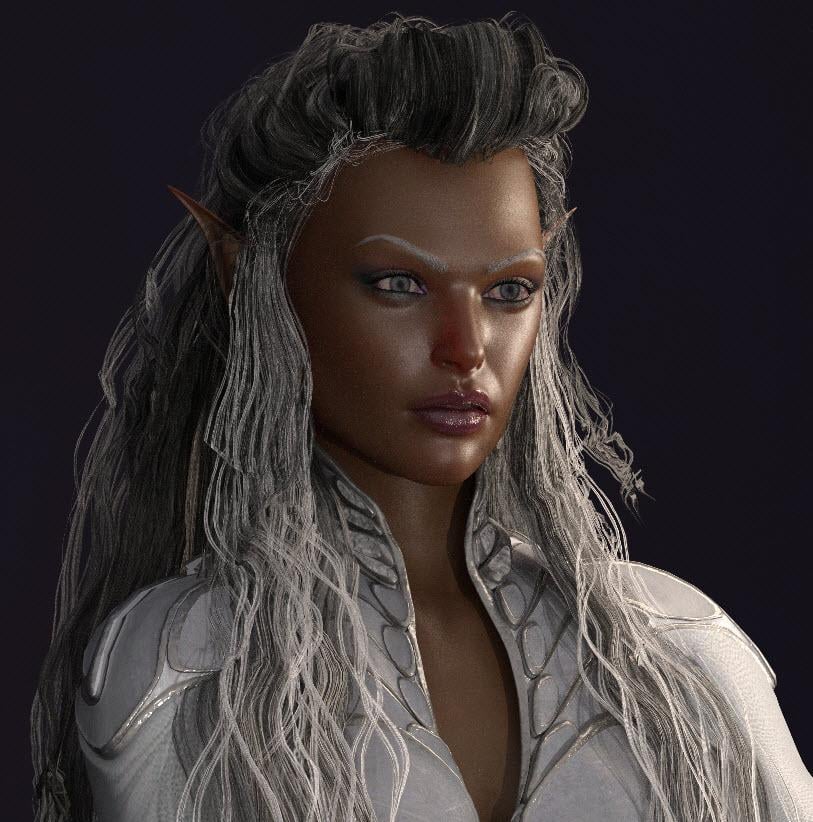
I'm pretty frustrated here. I played around with filtering, and I still can't get sharp focus. I just don't know what I'm doing - right or wrong.
Three renders, all are done with Pixel filter set to Mitchell and Pixel Radius at 0.5, 3000x3750 full body view. When I look at the face, it is either not sharp or pixelated.
First render is done with Boss Pro Lights

This is with Ultra Genesis (box lights)

This is with Aurora Lights (photometric spotlights)

Post edited by dracorn on


Comments
did you max out render time and iterations? You image is on the dark side, those take longer to get cleared up in Iray, so the alternative is to brighten up your image.
Or render it out at 2-3 times the size you need and scale down, although that technique hasn't worked that well for me.
As @Linwelly says, dark images take longer to clean up. Think back to film photography. The lower the ISO the finer the grain of the film, but the longer it needs to be exposed. ISO 400 was really popular for snapshots, but enlarging the image frequently showed a lot of grain in the darker areas. When I was still using film, most of my film was ISO 100, and some of it was even ISO 50! (Most of my photography was outdoors.) Even now with my digital camera, I keep the ISO to 100 most of time, (though my XTi is quite old, by DSLR standards.)
You can make the image brighter in the viewport, then use Tone Mapping to render it darker. Or render it brighter and darken it in Photoshop, Gimp, or whatever software you use. Or if you prefer, you can set Daz Studio to render the image longer.
To force Iray to render longer, start by turning Quality to Off. Now set Max Time to 0 (zero), effectively turning off the timer so the render will continue until it reaches the value in Max Samples. This is how I always render now, unless I double-click on a render setting and don't notice it's changed my default setup! (Annoying!) Anyway, I usually control quality of my renders by setting Max Samples. (Max Samples has a limit of 15000, which can be changed in the parameters. I've turned Limits off on that setting.)
If my render completes and I don't think it's done, I just bump up the Max Samples and Resume the render. No need to start over.
I like the Ultra Genesis lights best, but still kinda dark I'd also subd and add smoothing to that hair. Also try out different skins to see if any have more detail.
Really like the character though.
Does the skin shader you're using use the dual spec/chromatic dispersion? IMVHO, that makes for a shader that takes a lot longer (and is a lot harder for Iray) to resolve without noise.
Laurie
You can try to render the character apart from the background, and add the background in post. That will leave less work for your machine to do the rendering, and the HDRI light can add a bit more light to the scene so it renders faster and fuller. Iray is not very friendly with darkness, you either want to do that in post or force it by increasing the render time. Upping the render time could be brutal, though, because it can take *forever* depending on your hardware. Even strong hardware can be brought to a crawl.
Just a note, I'd do something with that hair. It has some jaggy curls in it. You can add smoothing or subD or both to it. Edit>Geometry>Add Subdivision. Add Smoothing is in that same list.
Add more light.
You might try these render settings: https://sta.sh/0c9kxxxt4fr
Here are a couple renders done with those settings. Click on them for full size.
If you don't get similar results it's perhaps your graphics card or machine.
Hey, everybody, thanks for the suggestions!
My machine is a couple of years old, but built robustly: Intel i7 6 core processor, GeForce 98ti.
Thanks, outrider42 and FSMCDesigns for your tips about the hair. I was planning on doing a little brushwork over the jagged strands in Photoshop. Does SubD increase render time? If I'm going to remove the time limit I may need to think about that.
The skin is FWSA Eliya for G3F on G8F.
Rendering without the background is definitely an option, but in the full body version, how do I account for the shadow on the floor?
... but I LIKE dark, dramatic lighting...! I got hooked on it in 3DL.
I do have Ghost Lights II and Tenebroso Lights, maybe I should add one of those to brighten it up a bit instead of the front box light. I've seen images which are rendered lighter and then darkened, and I am not thrilled about the results. But yes, I could brighten it up a little - the 3rd image is my favorite, minus the pixilation.
I can make a change to the time limit and resume the render? Thanks, L'Adair, I didn't know that.
I tried Tenebroso Lights, using the soft gray TL Soft 5, and moved the prop away to tone down the light. So yes, I added more light and a different kind of light. There is some very subtle pixelation in the shadow of the cheek on the left side (her right cheek). I could try the increase render time trick... but maybe I'm being too picky.
My only complaint is that the light is so soft that there are no highlights in her eyes. Guess I'll paint those in Photoshop.
You really can't see it here because I had to size it down for the forum.
Environment >> Draw Ground - "On" will draw the shadow. "Off" will render without a shadow.
You can always render lighter for faster render times and darken them in post (which is super fast and easy). You just need Gimp or Photoshop or just about any photo editing program will do it super fast. :)
SubD will increase your render time, but the results will probably be worth it.
When rendering in Iray without a backgound, in the Render Settings->Environment, set Draw Ground to on and it will render shadows you can use when compositing.
When you want to darken an image in photoshop, use adjustment layers and give Levels a try. next to the historgram you will see three eyedroppers. From top to bottom they are Black, Gray and White. Click on the top dropper and select a dark area of the image. The lighter the pixel you pick, the darker the image overall. Do the same with the bottom dropper and pick a very light area. experimant with that, and I think you'll find something you like. (As always, make sure to protect the original image. I always make a duplicate of the layer and leave the original intact on the bottom. I know other artists who duplicate the image and work from that, leaving the original file intact.)
I'm a fan of dark, dramatic lighting too... So I know how you feel!
There are a number of settings you can change, even while the image is rendering, from the settings in the render window. Look for the infinitesimal arrow on the left side, halfway up the window, and click on that to reveal the settings. Changing Tone Mapping and Filters will cause the render to start over, though, so be careful what you change. You can change Max Time to as long as you want it to be, in seconds. I just leave it at zero and control the length of the render by specifying the Max Samples, then set the image to render while I sleep. If the image is rendering at more than 3K samples per hour, I may even bump it to 30K because the computer will be running anyway. As long as you don't save the image or close the window, you can resume the render if your settings change. The resume button will be grayed out if you've reached one of the limit criteria, but will become available when you make a change.
Here's a tip: If your render has ended and you'd like to save a copy before making changes, go to the main Daz Studio window, (the one with your viewport, settings, etc.,) and go to File in the top menu. As your image has stopped rendering, there will be a temporary image saved, and by selecting, Save Last Render, you can save a copy of that file. If something goes wrong and you close your image without saving, you can often times save it this way, if you haven't closed DS.
And above all else... Have fun!
..I'm wondering if it isn't partly due to the skin bump. Could you post the non downsized image?
Hey Dracorn, one other thing to look at is texture compression. It is in the Render Settings tab/ Advanced. I think it defaults to High Threshold 1024, and you probably want to set that to 4096. Might or might not help. Just a thought.
Thanks everybody! I will try some more techniques after work!
The original is over 2 MB. The closest I can get is 94% and still be able to post it.
It seems that it's not so much that a render is dark that causes fireflies, it's more the character of the surface. Here are some crops from a render that has run for 9 respectively 20 minutes (GTX 1070), the dark areas are generally fine but her skin is still affected, after 20 minutes.
Hm, the forum is recompressing the pictures so details are lost, so here's the originals:
http://taosoft.dk/temp/iray_dark_render1&2.jpg
...indeed that looks to me more like surface detail than pixelation otherwise the edges would be more "ragged" and there would be fireflies in the black background.
If you're commenting on my samples, what I mean is that it's the type of surface or its pixel color/brightness/contrast variation that determines whether you get fireflies in low light or not.
..no, on Dracorn's image.
Noise or fireflies always will be part of the physics based renderers due to fact that are based on Monte Carlo integration algorithmn to solve the rendering equation which is the Fredholm integral equation. The Monte Carlo integration tries to solve the Fredholmn equation by randomly chosing samples, so, more samples means less noise, but also means more time. As a matter of fact NVIDIA is working in an optix denoiser that promises to speed rendering time by 12x.
You can read about here and here.
A few days ago I managed to reconstruct an image from just 8 samples instead of the default 5000 samples just by using PhotoShop. So when optix denoiser releases we'll know the minimum sampling required.
Great, thanks. I'm happy that I finally have a clean image.
12X?! Who hoo! How long will it take for Daz to upgrade their engine, I wonder.
OK. I agree with your conclusion.
Do tell....
12x sounds really great, but will it not affect quality in some way?
Yes, I saw that in another thread - not much difference in quality between the two, which is quite impressive.
The idea behind this is to increase quality and performance.
Well if you can increase both at the same time I like that idea!
12 times faster than normal, preferably.